Thursday, September 29, 2016

Quickstart on IDLE


On your Raspberry Pi, one of the quickest ways to begin programming in Python is by using the program IDLE, a Python development environment. Let's begin exploring and understanding IDLE, so our Python projects can go more smoothly.


Opening IDLE
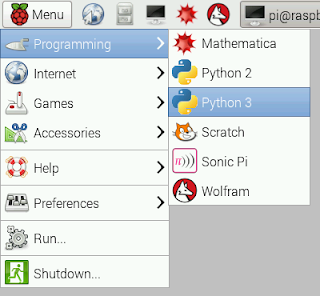
IDLE can be found in your menu under "Programming." You'll find two options here -- Python 2 and Python 3. Both of these are IDLE, however, Python 2 uses Python 2.7 (a more legacy version of Python), and Python 3 uses Python 3.4.


Using the Shell
Once you open IDLE (you can open Python 2 or Python 3, for this post it does not matter), you see a screen pop up that say "Python Shell" in the title bar, and list the version of Python you're using. You'll also be prompted with three arrow keys, that look like the following:

>>>

This is called a REPL (Read Evaluate Print Loop), and it's where we can type some Python commands. We can store variables here. For example, try typing the following:

>>> name = "Fluffy"
>>> "Hello " + name

What happens when you press enter? you should see it return the following:

'Hello Fluffy'

We can also use it as a basic calculator:

>>> 2 + 2

Upon hitting enter, it should spit out:

4

The shell is great for running commands like this, however, let's explore some different options for writing code in IDLE.

Hello World
To write a program we are going to want to create a file that we will run through the shell. This allows us to create a program instead of running just basic commands. To do this from IDLE, go to File > New Window. You'll see an empty page open (that looks a lot like a simplified Word Document!) and we will type in the following:

print("Hello World!")

Save your file as helloworld.py (make sure you put "py" and not "pi"!) and let's hit run! What happens?

You should be seeing your program run through the Python Shell and print 'Hello World!'

These are the basics of writing Python in IDLE. We will use this for most projects we do on this blog.


Questions? Comments? Ideas for future posts? I want to hear them! Please leave them in the comments below.

Tuesday, September 27, 2016

Arduino or Raspberry Pi?


I frequently hold workshops for kids who want to learn both programming and computer hardware, for which I use the Raspberry Pi. I get a lot of questions surrounding the difference between Raspberry Pi and Arduino, and which one is better. Both are great in their own respects, but both are different and it all depends on what you want to use it for. The main difference is the Raspberry Pi is a microprocessor, while the Arduino is a microcontroller

Let's start by looking at what each one is separately:

Raspberry Pi

The Raspberry Pi is a small pocket-sized computer (a single board computer - SBC), and is much more general-purpose than the Arduino. Much like your computer at home, it runs using an operating system (In our case, Linux) and can run more complex applications. Anytime you're making something that needs more power, Raspberry Pi is your best bet. It is more close to a computer than to the Arduino.


Raspberry Pi would be your best bet if you were making the following:

- Complex Robotics
- Learning to hack
- Cameras/Video
- Graphic interfaces
- Complex equations

If you're looking for tutorials or projects that you can do with the Raspberry Pi, look out for future posts or go take a visit to the Raspberry Pi foundation blog.

Arduino


The Arduino (also known outside of the US/UK as Genuino) is bare bones compared to the Raspberry Pi, as it is an 8-bit microcontroller used to do simple functions over and over again. Something to note is that the Arduino does not have an operating system like the Raspberry Pi.


Examples of when you might use an Arduino are the following:

- Motors
- Simple robotics (Like a line-following robot)
- Sensors
- Character LCDs

For more projects or tutorials that you can do with the Arduino, check out this page from their website.


If you're still confused on which to get, there is a general rule of thumb that I've read on a few different sites: Describe your project in a simple sentence. If you can do so with one or two 'and's, get an Arduino. If you need more than two 'and's, get a Raspberry Pi.


If you have any questions, or ideas for a blog post you want written, please feel free to let me know!